Create Campaign
Create campaigns to send out questionnaires to the intended recipients. To collect the risk and compliance data, you must create and launch campaigns. You can create a campaign from any of the following tabs:
What you'll need
- SAQ must be enabled for your subscription. Contact your Technical Account Manager or Support to get this feature.
- User must be assigned Manager or Unit Manager and Questionnaire Manager roles.
|
Go to the CAMPAIGNS tab and select New Campaign. - Give a name to your campaign. - Choose a questionnaire template from the Template Library.
|
|
Choose a workflow for your campaign Depending on the workflow you choose, the questionnaire answered by the responder is sent for review and approval. - Simple (2-stage) workflow send the questionnaire to user for information gathering. - Reviewable (3-stage) workflow sends the answered questionnaire to a reviewer for review. You can also add separate reviewers per section or subsection. - Full (4-stage) workflow sends the answered questionnaire to a reviewer and an approver. |
|
Add recipients for your campaign You can invite any number of users to complete your questionnaire. The recipients may include employees, partners, vendors, and subject matter experts, among others. Users can be: - in your subscription - outside of your subscription - from your organization - external to your organization In case you have users who have already answered this questionnaire in the past, then you can send the previously answered questionnaire. This questionnaire will be pre-filled with all the responses they answered previously. |
|
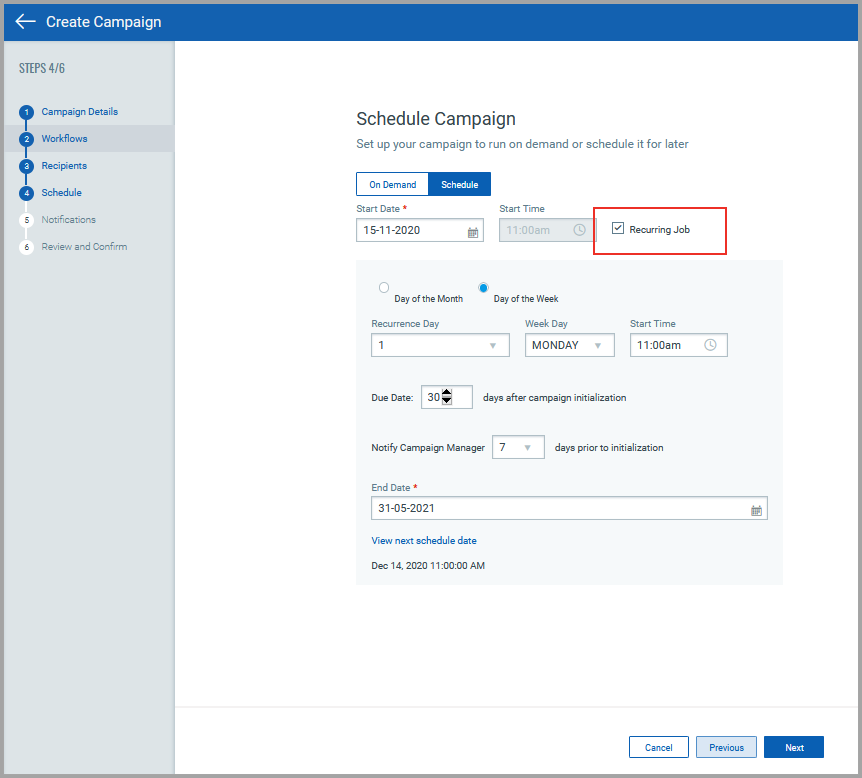
Schedule your campaign You can choose to run a campaign on demand, or schedule it and run automatically on a particular date and time. To schedule a campaign to run only once, keep the Recurring Job check box clear. Provide the start date, time, and a due date for your campaign. To run your scheduled campaign periodically, select the Recurring Job check box. As a recurring job, choose the options for the recurrence pattern. Set the due date for your campaign and an end date for your recurrence schedule. Set the day on which you want to notify the campaign manager about the initialization of a campaign. You can also view the next schedule date, which is calculated based on the recurrence options that you set.
|
|
Set notifications and reminders You can send notification mails to remind users about questionnaires assigned to them. In the Notifications section, specify when, how often, and at what stages of your campaign the notification mails must be sent to the user. |
|
Review and Confirm Review all that you selected, and launch your campaign. |
|
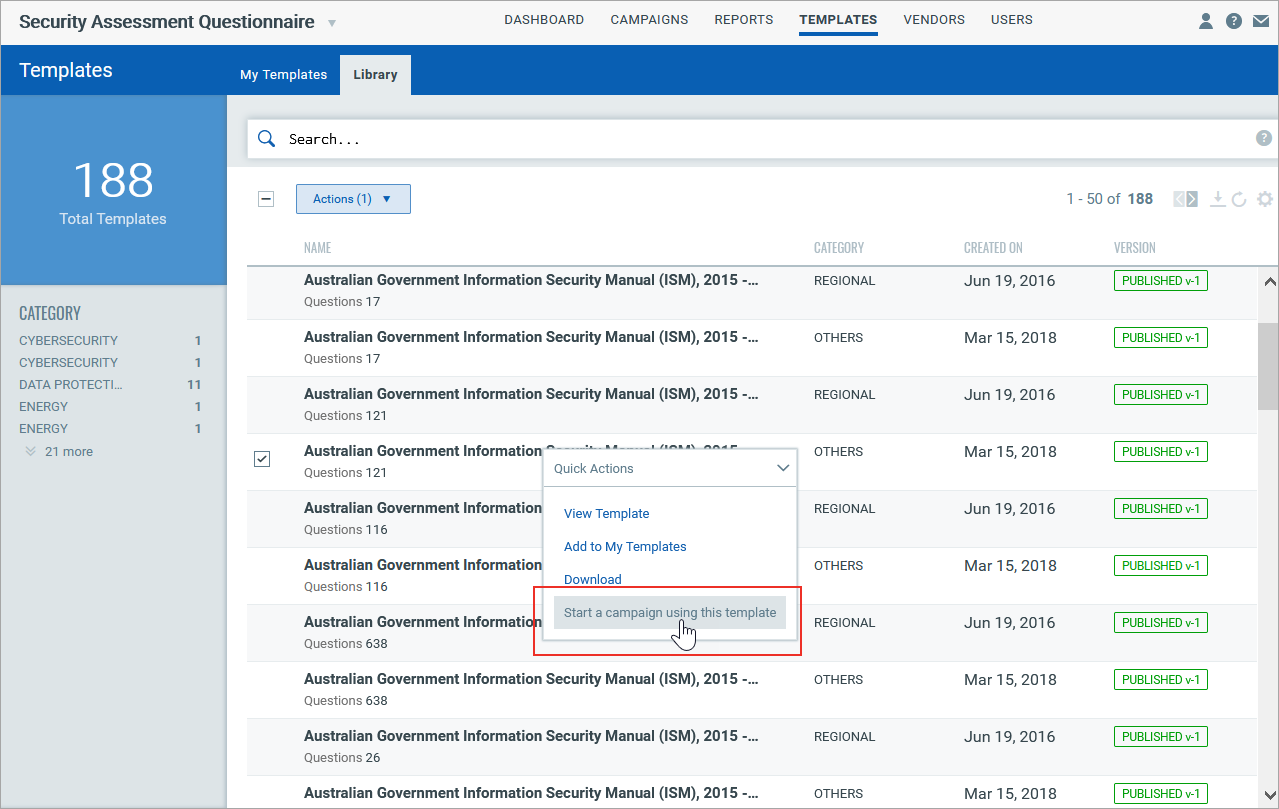
Go to the TEMPLATES tab and select a template either from the My Templates tab or the Library tab. Only published templates can be used to launch campaigns. - Open the Quick Actions menu, and click Start a campaign using this template. Alternatively, you'll find the Start a campaign using this template option on the Actions menu.
|
|
On the Create Campaign page, the questionnaire template is selected already. You can change the template if you want. All the remaining workflow for creating a campaign is as described in the Create a campaign from CAMPAIGNS tab section. |
|
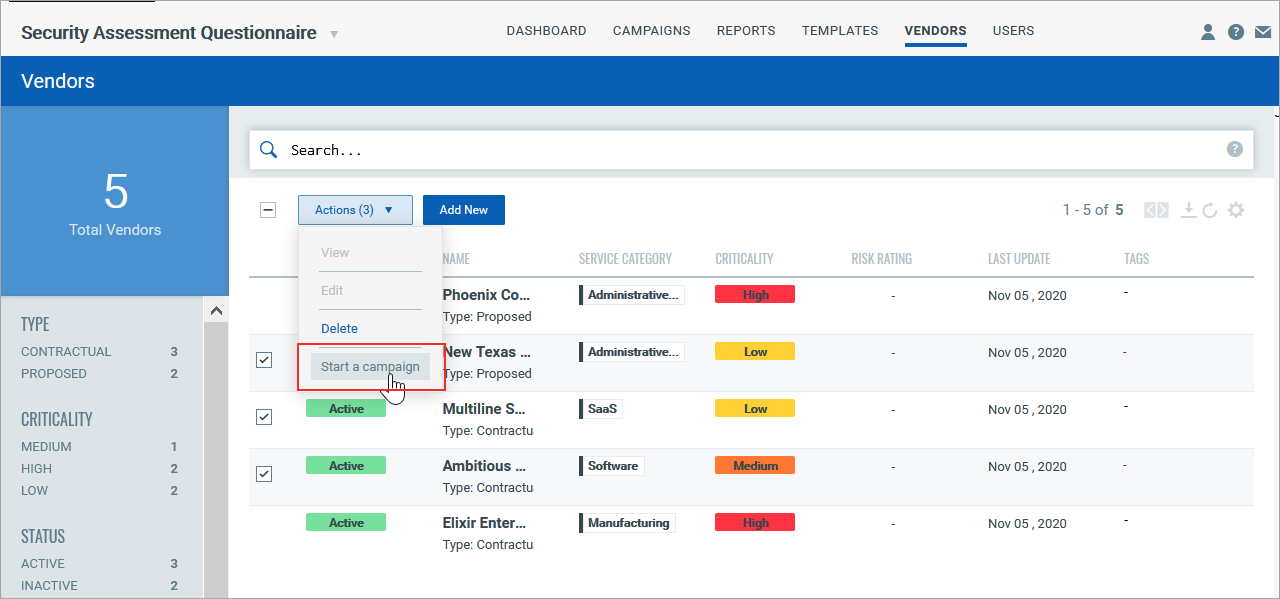
On the VENDORS page, select the vendors for whom you want to create and launch an assessment campaign. - To create a campaign for a single vendor, open the Quick Actions menu, and click Start a campaign. Alternatively, you'll find the Start a campaign option on the Actions menu. - To create a single campaign for multiple vendors, click Actions > Start a campaign.
|
|
On the Create Campaign page, on the Recipients tab, the users that you choose as single points of contact (SPOC) during vendor onboarding are displayed in the list of potential recipients for your campaign automatically. You can select these SPOCs as the intended recipients. This saves you an effort of manually adding users to the list of recipients. If you want to invite users other than SPOCs or if a SPOC is not assigned for a selected vendor, you can manually add the intended recipients. All the remaining workflow for creating a campaign is as described in the Create a campaign from CAMPAIGNS tab section. |
You can check out the tutorial about SAQ campaign:
You can check out the tutorial about campaign creation of Simple Workflow:
You can check out the tutorial about campaign creation of Full Workflow:
You can check out the tutorial about campaign creation of Reviewable Workflow:


